
No-Bake Keto Cheesecake Bites — Made in an Ice Cube Tray (Only 2g Carbs)
/The ice cube tray is the secret. It gives you 16 perfectly portioned, individual cheesecake bites — no muffin pan, no springform, no slicing, no serving. You freeze them, pop them out, and eat them whenever you want one. Two net carbs. Done.
These no-bake keto cheesecake bites have a buttery almond flour crust pressed into the bottom of each section, a creamy monk fruit–sweetened cream cheese filling with a hint of lemon and vanilla, and two blueberries pressed into the top before freezing. When you pop one out and let it thaw for three minutes, the texture is cold and creamy — like cheesecake ice cream in bite form.
Why you'll love these keto cheesecake bites
Only 2g net carbs each • Made in a standard ice cube tray — no special equipment • No baking, no oven, no water bath • 16 perfectly portioned bites from one batch • Keeps in the freezer for weeks • Almond flour crust that actually holds together • Customizable toppings and flavors
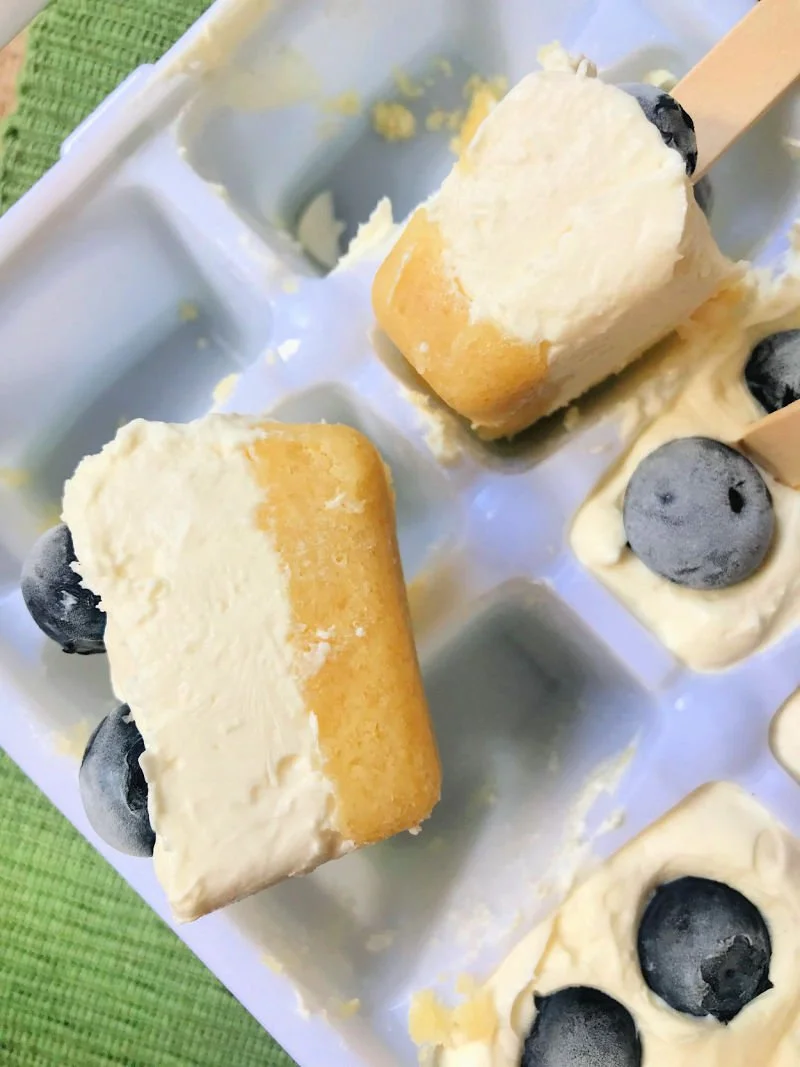
Why an Ice Cube Tray — The Smartest Cheesecake Hack
Most no-bake cheesecake bite recipes use a mini muffin pan, which requires cupcake liners and then careful removal — and the crust still crumbles half the time. Some use a regular muffin pan with full-size bites, which means you're eating 8 carbs instead of 2.
The ice cube tray solves all of this. Here's why it works:
Perfect portion size. Each section of a standard ice cube tray holds just enough filling for a two-bite cheesecake — literally one net carb per bite. You get 16 bites per batch.
The freezer does all the work. No baking, no temperature watching, no jiggle test. Fill, freeze for 2 hours, pop out, eat. The filling sets firm enough to hold its shape but thaws to a creamy texture in 3-5 minutes.
Easy removal — if you do it right. See the section below on exactly how to pop them out without breaking the crust. It's simple once you know the technique.
Perfect for long-term freezer storage. Transfer the bites to a freezer bag after they're frozen solid and they keep for up to 4 weeks. Individual portions you can pull whenever you want one, no planning required.
What type of ice cube tray works best?
A standard plastic ice cube tray (the kind that comes with most freezers) works perfectly. Silicone ice cube trays are even better — the flexible sides make it easier to pop the cheesecake bites out without the butter knife step. If you have one, use it.
Ingredients
ALMOND FLOUR CRUST
1 cup Super fine Almond Flour
2 tablespoons Kerrygold grass-fed butter, melted
2 tablespoons Lakanto Granulated Monk Fruit Sweetener
CREAM CHEESE FILLING
8 oz cream cheese, softened to room temperature — full fat
1/2 cup plain unsweetened Greek yogurt — full fat
3 tablespoons Lakanto Granulated Monk Fruit Sweetener
1 teaspoon Organic pure vanilla extract
Juice of 1/2 lemon — about 1 tablespoon
TOPPING
32 blueberries — 2 per cheesecake bite (about 1/2 cup)
Optional: popsicle sticks — insert before freezing for cheesecake pops
Greek yogurt in a keto recipe?
Full-fat plain Greek yogurt is low enough in carbs to work in a recipe like this. A 1/2 cup divided across 16 bites is less than 1g of carbs per bite from the yogurt. It lightens the texture of the filling so it's creamy rather than dense, and adds a subtle tang that rounds out the cheesecake flavor. Make sure you're using plain, full-fat — not flavored, not nonfat. Flavored Greek yogurt can have 30-40g of carbs per cup.

How to Make the Almond Flour Crust
Combine crust ingredients. In a small bowl, mix together the almond flour, melted butter, and 2 tablespoons of monk fruit sweetener. Stir until evenly combined — the mixture should look like damp sand and hold its shape when pressed between your fingers. If it's too dry and crumbly, add another teaspoon of melted butter.
Press into ice cube tray. Divide the crust mixture evenly across all 16 sections of the ice cube tray. Add approximately 1 teaspoon of mixture per section. Using the back of a small spoon, press the mixture firmly into the bottom of each section — the key word is firmly. A loosely packed crust will fall apart when you pop the bites out. Press until it feels compact and holds its shape.
Set aside. Don't freeze the crust before adding the filling — just set the tray aside while you make the filling. The two layers bond better when the crust is still at room temperature when the filling goes on.
How to Make the Cream Cheese Filling
Soften the cream cheese. This step is non-negotiable — the cream cheese must be fully at room temperature before mixing. Cold cream cheese doesn't blend smooth; it creates lumps that don't go away no matter how long you mix. Leave it on the counter for at least 1 hour, or 90 minutes if your kitchen runs cool. It should feel soft when you press your finger into it.
Beat until smooth. In a medium bowl, beat the softened cream cheese with a hand mixer on medium speed until completely smooth with no lumps — about 2 minutes. Scrape the sides and bottom of the bowl.
Add remaining ingredients. Add the Greek yogurt, vanilla extract, lemon juice, and 3 tablespoons of monk fruit sweetener. Beat on medium speed until fully combined and smooth, about 1 more minute. Taste and adjust sweetness if needed — add another teaspoon of monk fruit if you want it sweeter.
Fill the tray. Spoon the cream cheese filling evenly over each crust section. Fill each section to the top — it won't overflow and the bites will look more finished. Smooth the tops with a spoon or offset spatula.
Add blueberries. Press 2 blueberries gently into the top of each cheesecake bite, pushing them in slightly so they're embedded in the filling.
Optional — add popsicle sticks. If you want cheesecake pops, insert a popsicle stick into the center of each bite, pushing down about 3/4 of the way through. Fun for kids and parties, though I usually skip this step — I eat them in two bites anyway.
Freeze. Place the ice cube tray on a flat surface in the freezer. Freeze for at least 2 hours, or overnight. The bites are done when they're completely solid.
How to Get Them Out of the Ice Cube Tray — Without Breaking Them
This is the step that trips people up if they rush it. Here's the right technique:
Don't pull straight up. Pulling the bite straight up from the tray almost always breaks the crust. The crust is attached to the bottom and needs a little help releasing before the bite can come out cleanly.
Run a butter knife around the edges. Use the tip of a butter knife to loosen the edges of each cheesecake bite — run it between the bite and the tray wall on all four sides. Don't pry or lever, just trace the edges.
Flex the tray if silicone. If you're using a silicone tray, gently push up from the bottom of each section while holding the top of the bite. The flexible sides release the bite cleanly without the butter knife step.
For plastic trays — invert briefly. Turn the tray upside down and press lightly on the bottom of each section. If the bites have been frozen long enough (at least 2 hours), they should release with gentle pressure. If they're sticking, give them another 30 minutes in the freezer.
Let thaw 3-5 minutes before eating. Straight from the freezer, these are very firm — like frozen cheesecake ice cream. Let them sit on a plate for 3-5 minutes and they soften to a creamy, melt-in-your-mouth texture. That's the sweet spot.

How to Serve and Store
Serving
Thaw on a plate for 3-5 minutes before eating. Serve on a small plate with extra blueberries on the side, or add a small dollop of sugar-free whipped cream on top. For parties, arrange them on a platter with a toothpick in each bite — elegant and easy.
Storage in the freezer
Once the bites are fully frozen in the tray, pop them all out and transfer to a zip-lock freezer bag or airtight freezer container. This prevents them from absorbing freezer odors and makes them much easier to grab one at a time. Keep frozen for up to 4 weeks — the texture stays perfect.
Refrigerator
You can store thawed cheesecake bites in the fridge for up to 3 days, but the texture will be softer — more like a traditional cheesecake than a frozen cheesecake bite. Both are good; it just depends on your preference.
Can you refreeze?
Yes — if you've let a bite thaw and don't finish it, you can refreeze it. The texture will change slightly (a little icier) after a second freeze-thaw cycle, but it's still perfectly edible.
Flavor Variations and Topping Ideas
The base vanilla lemon cheesecake filling is perfect as-is, and it's also a blank canvas for variations:
Fruit toppings
2 raspberries instead of blueberries — more tart, beautiful color
1 sliced strawberry pressed into the top before freezing
Blackberries — press 1-2 into the center
Lemon curd — drop 1/4 teaspoon on top before freezing for an extra lemon punch
Flavor variations for the filling
Chocolate swirl: melt 1 tablespoon of Lily's dark chocolate chips and drizzle over the filling before freezing, then swirl with a toothpick
Pumpkin spice: add 2 tablespoons of pumpkin puree + 1/2 teaspoon of pumpkin spice to the filling — omit the lemon juice
Key lime: substitute lime juice and zest for the lemon
Strawberry: fold 2 tablespoons of finely diced fresh strawberries into the filling before pouring
Fun extras
Press a Lily's chocolate chip into the center of each bite instead of blueberries
Add a very thin drizzle of Mike's Hot Honey over the top after thawing — the salt-sweet-sour combination is unexpected and excellent
Make them as popsicles for kids — add popsicle sticks and dip the frozen bites in melted Lily's chocolate chips for a chocolate-covered cheesecake pop
Frequently Asked Questions
Do I need a special ice cube tray?
No — a standard plastic ice cube tray from any grocery or home goods store works perfectly. Silicone ice cube trays make removal slightly easier since the flexible sides help release the bites, but both work. Avoid silicone ice cube trays with very small sections (cocktail-sized mini cubes) — you want standard size so the crust has enough depth.
How do I get the cheesecake bites out without breaking them?
Run a butter knife around the edges of each bite first to loosen, then press up gently from the bottom. The most common mistake is not freezing long enough — they need at least 2 full hours. If they're sticking, they need more time in the freezer. Silicone trays are significantly easier to unmold than plastic.
Can I use a muffin tin instead of an ice cube tray?
Yes — a mini muffin tin with cupcake liners works well. The bites will be slightly larger (about 4-5 net carbs each instead of 2) and the texture when thawed will be similar. Don't use a standard muffin tin — the bites will be too large to eat in 2-3 bites and the portion sizing loses the advantage.
How many net carbs in keto cheesecake bites?
2g net carbs per bite (2.9g total carbs minus 0.9g fiber). Full nutrition: 105 calories, 9.3g fat, 3g protein, 1.7g sugar. This is based on the recipe making 16 bites and using the blueberry topping. Omitting the blueberries reduces to approximately 1.5g net carbs per bite.
Can I make these dairy-free?
For a dairy-free version, substitute dairy-free cream cheese (Kite Hill almond milk cream cheese is the best option) and coconut yogurt for the Greek yogurt. The texture will be slightly softer but the flavor is excellent. Use refined coconut oil instead of butter for the crust.
How long do they last in the freezer?
Up to 4 weeks in an airtight freezer bag. After that the texture starts to deteriorate slightly and they can pick up freezer flavor. Transfer them from the ice cube tray to a zip-lock bag after they're fully frozen to maximize freshness.
Can I make these as no-bake cheesecake cups (not frozen)?
Yes — spoon the filling into small glasses or ramekins over the crust and refrigerate for at least 2 hours instead of freezing. The texture will be creamy and soft rather than firm, more like a traditional no-bake cheesecake. These keep refrigerated for up to 4 days.
More Low Carb Desserts

No-Bake Keto Cheesecake Bites Recipe
These no-bake keto cheesecake bites are made in an ice cube tray with an almond flour crust and monk fruit filling. Only 2g net carbs each. Frozen, creamy, and perfect.
Ingredients
Instructions
- Make the crust. Mix almond flour, melted butter, and 2 tablespoons monk fruit sweetener. Press 1 teaspoon firmly into the bottom of each ice cube tray section.
- Make the filling. Beat softened cream cheese until completely smooth. Add Greek yogurt, vanilla, lemon juice, and 3 tablespoons monk fruit sweetener. Beat until smooth.
- Fill and top. Spoon filling evenly over each crust section, filling to the top. Smooth the surface. Press 2 blueberries into each bite. Insert popsicle sticks if using.
- Freeze. Freeze on a flat surface for at least 2 hours or overnight until completely solid.
- Remove. Run a butter knife around the edges of each bite and press up gently. For silicone trays, push up from the bottom. Transfer to a freezer bag for storage.
- Serve. Thaw 3-5 minutes before eating for the best creamy texture.
Notes
- Cream cheese must be fully room temperature — cold cream cheese creates lumps that can't be beaten out
- Press the crust very firmly — a loosely packed crust breaks apart during removal
- Silicone ice cube trays are easier to unmold than plastic
- Store in a freezer bag (not the tray) for up to 4 weeks

Nutrition Facts
Calories
105Protein
3 gCarbs
2.9 gFiber
.9 gSugar
1.7 gFat
9.3 gNet carbs
2 g



Nutritional information is provided and I keep it as accurate as possible. Keep in mind nutrition facts on all ingredients may vary depending on the different brands you may use. I am not a doctor and advise solely from personal experience. Please consult your doctor before adding any supplement or foods to your current diet and Read our full Terms & Conditions.



This dairy-free peanut butter apple dip uses Cocojune coconut yogurt, peanut butter, cinnamon, honey, and Lily's sugar-free chocolate chips. 2 minutes, 5 ingredients, one apple for dipping.